支持Redux在WebStorm中像Vuex一样智能跳转
之前的负责项目是用vue写的,vuex是专门为vue定制的,上手十分容易,由于是官方统一维护,webstorm在2020版本也已经支持直接从type字符串跳转到对应module定义。
最近有新项目打算统一使用React技术栈,研究了一下目前React状态管理主流方案,还是redux/mobx之类的,由于redux默认的combineReducers功能比较弱,且webstorm貌似不支持字符串type直接跳转到reducer定义,比较影响开发效率,因此决定研究一下相关的解决方案。
前面简单提到了目前redux存在的一些缺点
- 模板代码太多,影响开发效率
- 各种轮子一层一层封装(如dva等),webstorm无法支持智能跳转,影响代码阅读性
本文主要研究尝试在React项目中解决这两个问题。先来看看常规的写法
原始的react-redux
redux本身提供的概念很简单,通过initState、reducer构建store,然后dispatch一个action,通过reducer返回新的state,如果组件订阅了store的变化,就可以触发视图的变化
为了避免频繁手动订阅带来的工作量,react-redux提供了provider通过props注入state和dispatch,并通过connect实现自动订阅更新
const ADD_COUNT = "ADD_COUNT"

const initState = {
    count: 0
}
const reducer = (state = initState, action) => {
    switch (action.type) {
        case ADD_COUNT:
            return {...state, count: action.payload}
        default:
            return state
    }
}

const store = createStore(reducer, initState)

const mapStateToProps = (state) => {
    return {
        count: state.count
    }
}

const Counter = connect(mapStateToProps)(({count, dispatch}) => {
    const add = () => {
        dispatch({type: ADD_COUNT, payload: count + 1})
    }
    return (<div>
        <button onClick={add}>click {count}</button>
    </div>)
})

const Demo = () => {
    return (<Provider store={store}>
        <Counter/>
    </Provider>)
}实现一个计数器增加的demo,在之前大概要写这么多代码,在hooks出来之后,可以使用useSelector和useDispatch等方法编写代码,避免HOC带来的层层嵌套
const Counter2 = () => {
    const count = useSelector((state) => state.count)
    const dispatch = useDispatch()
    const add = () => {
        dispatch({type: ADD_COUNT, payload: count + 1})
    }
    return (<div>
        <button onClick={add}>click {count}</button>
    </div>)
}
看起来少了一层connect是会简洁不少,但仍旧存在一些问题
- reducer中的switch case很不优雅
- 大型项目涉及到拆分reducer,还需要尽量避免actionType的命名冲突,但
combineReducers只对state进行了区分,对于action type而言仍旧是全局的 dispatch{type:ADD_COUNT}这种写法,点击ADD_COUNT只能跳转到声明这个action type的地方,然而在开发中更希望能够智能跳转到reducer处理这个type的地方
之前在项目中使用过dva,其中将应用状态拆分成model的思想是很不错的,先简单回顾一下使用方法
状态管理
首先定义model,同时声明namespace
// model/test.js

export default {
    namespace: 'test',
    state:{
        count:1
    },
    reducers:{
        addCount(state, count){
            return {
                ...state,
                count
            }
        }
    },
    effects: {
        * queryCount({ payload }, { call, put }) {
            const count = yield call(queryApi);
            yield put({ type: 'addCount', count);
        },
    },
};
然后在应用注入model(在umi等框架中放在models目录下的model将会被自动注册)
app.model(require('./models/test').default);最后同样通过connect关联model和视图,使用方法与上面的react-redux一致,这里也使用hook的形式编写
const Counter = () => {
  const count = useSelector((state) => state.test.count);
  const dispatch = useDispatch();

  const add = () => {
    dispatch({ type: `test/addCount` });
  };

  return (
    <div>
      <button onClick={add}>click {count}</button>
    </div>
  );
};
dva的另一个特点是集成了redux-saga,用来处理异步流程,saga的功能非常强大
const queryApi = async () => {
  await sleep(100)
  return 2
};
export default {
    namespace: 'test',
    // ...省略state和reducers
    effects: {
        * queryCount({ payload }, { call, put }) {
            const count = yield call(queryApi);
            yield put({ type: 'addCount', count);
        },
    },
};
saga缺点在于需要理解很多新的概念,我们的项目可能根本不需要用到这么复杂的异步控制流程,反而会增加很多样板代码,这对于开发效率来说无疑是负担
在webstorm中提升redux项目的开发效率
dva通过命名空间解决了actionType命名的问题,并通过reducers和effects区分了同步action和异步action,就统一代码风格来说还是很不错的。
缺点在于还是不能解决webstorm中字符串actionType智能跳转的问题,同时也就无法使用Find Usages等重度代码阅读功能,在使用了webstorm2020开发Vue项目之后,这些缺失很难受。
这大概是React自由社区带来的一些弊端,在大量轮子产生的同时,很难让IDE官方做出统一的支持;
反观Vue统一的技术栈带来的好处之一便是能够让IDE及时做出更新,这是当时webstorm社区的一个提问: Vuex namespaced Module navigation detection,在我发现更新webstorm支持这个功能后欣喜若狂,但遗憾的是目前我还没有找到webstorm有类似支持redux的功能(毕竟redux本身并没有namespace的概念)
一种可能的方法是使用typescript,通过更友好的代码提示来替代对于代码跳转的依赖,参考:官方文档:redux-with-typescript,这要求我们需要针对每个type编写不同的类型
另外一种方式是编写webstorm插件,实现类似的功能,找到了一个dvaHelper,但使用了一下好像并不能正常工作。vscode可以使用umi pro
还有一种方式,采用类似于vuex的module写法,再编写一个模板文件,就可以“欺骗”webstorm帮助我们实现智能提示。
下面是简单的尝试demo
使用vuex的方式编写module
编写module文件,代码风格与vuex完全保持一致
const sleep = (delay) => new Promise((resolve) => setTimeout(resolve, delay));

export default {
  namespaced: true,
  state: {
    count1: 0,
  },
  mutations: {
    setCount1(state, payload) {
      state.count1 = payload;
    },
  },
  getters: {
    doubleCount(state, getters) {
      console.log(state);
      console.log(getters.minusCount);
      return state.count1 * 2;
    },
    minusCount(state) {
      return 'xxx sub minusCount';
    },
  },
  actions: {
    async fetchCount1({ rootState, commit }) {
      await sleep(500);
      commit('setCount1', rootState.test.count1 + 1);
    },
  },
};
注册store
import { initStore } from './core';
import test from './modules/test';
import test2 from './modules/test2';

export const store = initStore({
  modules: {
    test,
    test2,
  },
});
store暴露的几个核心接口包括
stategetterscommit提交同步actiondispatch提交异步action
之后就可以在组件中使用store了
import { Provider, connect } from 'react-redux';
import { store } from '../store';

const MyRootComponent = connect((state) => {
  return {
    count1: store.state.test.count1,
    doubleCount: store.getters['test/doubleCount'],
  };
})(({ count1, doubleCount }) => {
  const add = () => {
    store.commit('test/setCount1', count1 + 1);
  };

  const addAsync = () => {
    store.dispatch('test/fetchCount1', count1 + 1);
  };

  return (<div>
    hello store:state count {count1}, getters doubleCount {doubleCount}
    <button onClick={add}>click time{count1}</button>
    <button onClick={addAsync}>async click time{count1}</button>
  </div>);
});

const Page = () => {
  // const store = useStore();
  return (<Provider store={store.reduxStore}>
    <MyRootComponent />
  </Provider>);
};
export default Page;
来看看initStore的核心实现,主要是根据每个module的配置,将其mutations和actions转换成对应的reducer,
import { createStore, combineReducers } from 'redux';

function transformVuexModule2Reducer(module, namespace) {
  const { state: initState, mutations, actions } = module;
  return (state = initState, action) => {
    const { type, payload } = action;
    const [name, t] = type.split('/');
    if (name !== namespace) {
      return { ...state };
    }

    // 内部允许直接通过state.xx修改,与vuex保持一致
    mutations[t](state, payload);

    module.state = { ...state }; // 更新成新的state, 这里没有执行深拷贝,可以使用immer.js等进行处理,或者交给每个module自己控制state更新的数据

    return module.state;
  };
}

export function initStore({ modules }) {
  const keys = Object.keys(modules);
  const reducers = keys.reduce((acc, key) => {
    acc[key] = transformVuexModule2Reducer(modules[key], key);
    return acc;
  }, {});

  // 使用combine reducer等将vue module转换成 reducer
  const initState = keys.reduce((acc, key) => {
    acc[key] = modules[key].state;
    return acc;
  }, {});

  const rootReducer = combineReducers(reducers);
  const store = createStore(rootReducer, initState);

  // 同步action
  const commit = (type, payload) => {
    store.dispatch({ type, payload });
  };

  // 异步action
  const dispatch = async (type, payload) => {
    const [name, t] = type.split('/');
    const { actions } = modules[name];
    // 处理当前作用域下的action
    const nameDispatch = (type, payload, opt) => {
      if (opt && opt.root) {
        return dispatch(type, payload);
      }
      return dispatch(`${name}/${t}`, payload);
    };
    const nameCommit = (type, payload, opt) => {
      if (opt && opt.root) {
        return commit(type, payload);
      }
      return commit(`${name}/${type}`, payload);
    };
    await actions[t]({ commit: nameCommit, rootState: store.getState(), dispatch: nameDispatch }, payload);
  };

  const rootGetters = new Proxy({}, {
    get(target, type) {
      const [name, t] = type.split('/');
      const { getters, state } = modules[name];

      const nameGetters = new Proxy({}, {
        get(target, type) {
          return getters[type](state, nameGetters, store.getState(), rootGetters);
        },
      });

      return getters[t](state, nameGetters, store.getState(), rootGetters);
    },
  });

  return {
    reduxStore: store,
    get state() {
      return store.getState();
    },
    getters: rootGetters,
    commit,
    dispatch,
  };
}
上面解决了reducer拆分的问题,接下来”欺骗webstorm“进行代码导航了
同时在store目录下创建一个template文件,按照vuex的方式编写初始化store的代码,这个文件仅用来触发webstorm的智能提示,不参与真实的打包,但还是需要安装vue和vuex哦
import Vue from 'vue'
import Vuex from 'vuex'

import test from './modules/test'
import test2 from './modules/test2'

Vue.use(Vuex)


const store = new Vuex.Store({
  modules: {
    test,
    test2
  },
})

export default store
然后,将鼠标移动到对应的actionType上面,就可以看见智能提示了
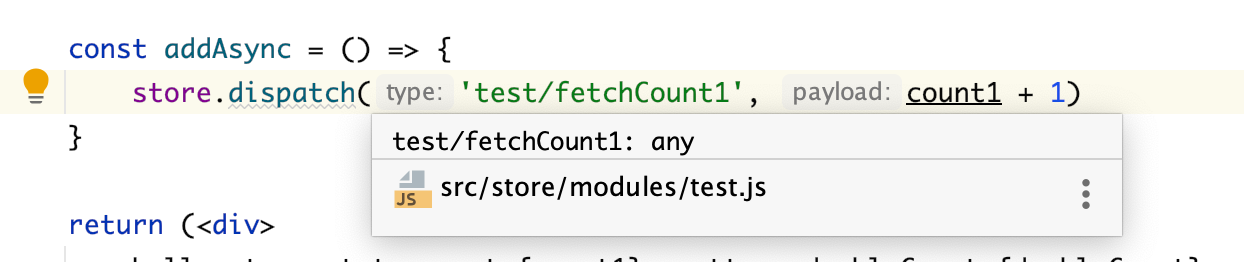
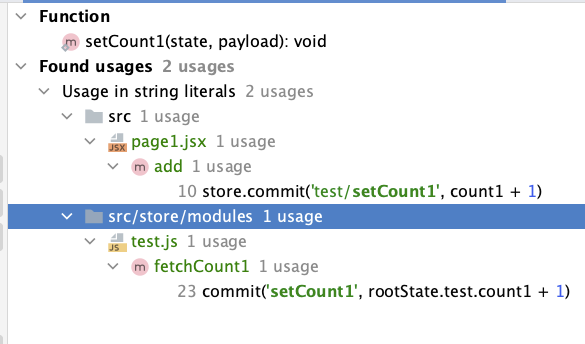
也可以愉快地使用Find Usages等功能了
不如使用Redux-toolkit?
本文主要研究了如何更合理的拆分reducer,以及实现webstorm中redux的智能提示,相关代码均位于github上面,可以拉下来使用webstorm体验一下。
整个解决过程看起来很hack,有些骚操作,是否能够真实用在项目中,还需要仔细掂量一下。
在查阅资料的时候发现了redux-toolkit这个库,体验课一下,这不正解决了我想要处理的问题吗(一年多没写React,对于相关的生态确实没太关注)
其大致步骤为
- 通过
createSlice拆分module,暴露出State、reducer和action - 通过
configureStore将各个module注册到store中, - 在组件中使用
useDispatch和useSelector等hook与store进行交互
redux-toolkit是纯粹的JavaScript实现,也解决了webstorm智能跳转的问题,此外对于TypeScript的支持也很友好,看起来完全可以用在生成环境中,也可以保持React风格的代码~
由于是新项目的技术选型,在目前这个比较尴尬的时间点,是选旧项目其他同事很熟悉的Vue2,还是刚出来几个月的Vue3,或者是使用就久经战场的React,都需要好好考虑一下,接下来应该去看看目前主流的React项目开发方式,毕竟智能跳转只占技术选型的一小部分比重而已,核心目的就是:开发体验好、效率高、不加班还能完成任务~
你要请我喝一杯奶茶?
版权声明:自由转载-非商用-保持署名和原文链接。
本站文章均为本人原创,参考文章我都会在文中进行声明,也请您转载时附上署名。